When coaching younger or newer players, it’s vital that they learn rugby’s core skills first. Focus on helping players develop the proper techniques for each of these skills, and then move into helping them apply those techniques in a game situation. The ability to execute a proper rugby tackle is one such core skill. “Proper” refers to using the correct tackling technique, which will keep players safe and help players feel comfortable tackling ball carriers of all sizes and shapes. This guide features a variety of training drills that help players improve their tackling abilities.
Developing the Form
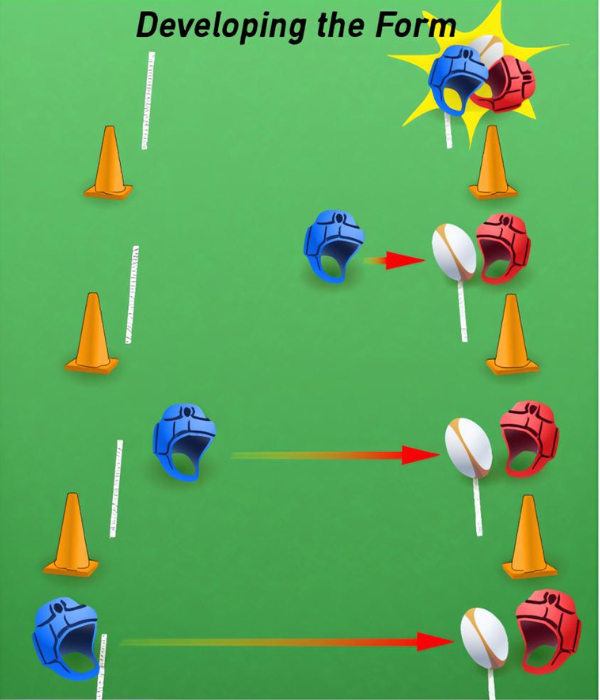
This first drill is very simple, and walks players through the first two phases of the rugby tackle: Positioning and contact.
- Have players line up in two parallel lines, with a few meters between each player and both lines. The lines should be facing inward, so both rows look at the other.
- Designate one row of players as the tacklers, and the other row as the ball carriers. Have the tacklers in a good pre-tackle body position, with the ball carriers standing upright. Take a moment to look over their stances, and make sure they look technically sound.
- Explain that you will call out either “left” or “right” every few seconds. The tacklers should step to the side you call out and wrap up the ball carrier immediately across from them.
- For the first few repetitions, tell players to freeze after they wrap up the ball carrier. This will give you a chance to look over their form.
- After a minute or several repetitions, the tacklers become the ball carriers and vice versa. Repeat the drill with the new tacklers.
This drill is meant to be performed at a reduced speed and with minimal contact. Explain that players should want to react quickly, but not hit the ball carrier very hard at all. And although the speed of the drill increase as they become more comfortable with the motions, the focus is on making sure your players are using the right technique: Good pre-tackle stance, proper tackle location, and head on the safe side.
Wrap & Finish
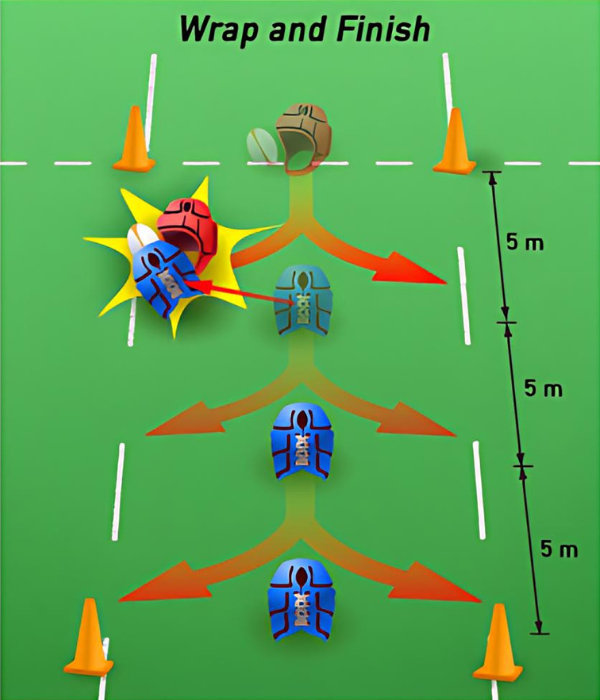
While the “Form” drill works on the first half of the tackling process, this drill focuses primarily on the second half: Wrapping and finishing. This drill is a bit more complicated and involves a significantly higher level of physicality, so be sure to walk players through the drill beforehand.
- Pick three players. Have them in a vertical line, spaced five meters apart, and on their knees. These players are the tacklers.
- Line up the other players starting five meters in front of the first tackler. These players are the ball carriers. The tacklers and ball carriers should face each other.
- One ball carrier at a time jogs straight towards the first tackler. The ball carrier picks a side of the tackler, either left or right.
- A few meters before he reaches the tackler, the ball carrier quickly heads to that side of the tackler. The ball carrier must run within one meter of each tackler, regardless of which side is picked.
- The tackler initiates contact, wraps up the ball carrier, and takes him down.
- After the ball carrier meets the first tackler, he gets up and repeats the same process with the second and third tacklers.
This drill focuses on helping players develop the technique for the second and third phases of the tackle technique. Make a point of reminding the tacklers to put their heads on the safe side of the ball carrier. Also, the first few repetitions should be done with the ball carrier approaching the tackler at a jog. Once you’re sure the tacklers know what they’re doing, tell the ball carriers to approach a bit faster. To increase the overall pace, send the next ball carrier in as soon as the previous one reaches the third tackler.
One-on-One Simulation
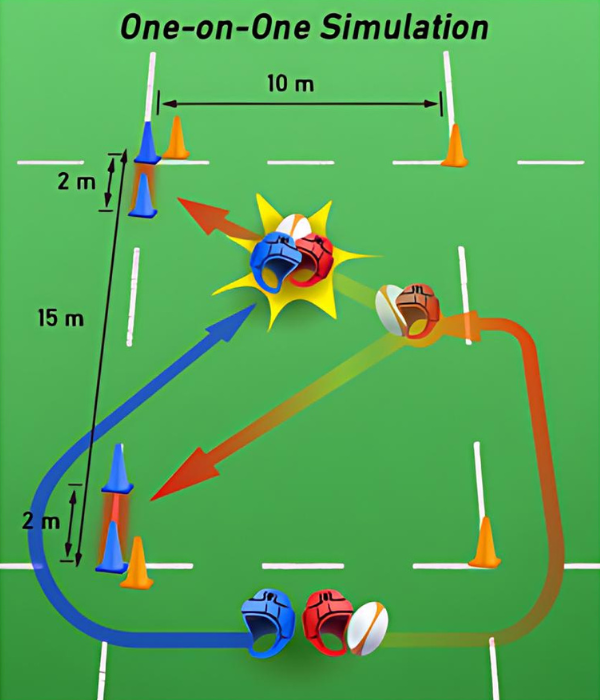
This drill is essentially a live tackling situation within a specific marked-off area. It should not be attempted until you think your players’ techniques are fundamentally sound. Basically, it pits a ball carrier against a tackler within a confined area, and requires the tackler to put all three phases of the tackle together.
The first step is to set up the “tackle zone.” Cone off an area that measures 10-meters long by 15-meters wide. Along one of the 15-meter sides of this area, mark off two sections approximately two-meters long (with different colored cones, if possible). These areas should be at opposite ends of the selected side.
Here’s an overview of how the drill works:
- Pick two players: A ball carrier and a tackler.
- Line them up back-to-back outside of the area, exactly in the middle of one of the 10-meter lines.
- At the whistle (shout, clap, etc.) both players sprint ahead, round the nearest cone, and enter the “tackle zone”.
- The ball carrier’s objective is to score. To do so, the ball carrier must make it through one of the two gates — the two-meter long sections along the tackler’s side of the zone. Going through the middle of that line doesn’t count.
- The tackler’s objective is to tackle the ball carrier before he crosses through one of the gates.
Again, this drill should only be introduced once you’re confident that your players have a good grasp of the tackling technique. You should also walk through the drill a few times to ensure that your players understand the rules of the drill.
Teach the Skill, Not the Drill
As with any drill, it’s important to look for signs that your players are improving. The drills outlined above do a good job of helping players move through the tackling process one phase at a time. That should also make it easier for you as a coach to accurately gauge the development of your players. Also, not every exercise may be appropriate for your players, so alter your drills accordingly. Regardless of the skill you’re trying to teach, the important thing is that you find drills that help your players improve.

